
- Download Extent Reports latest version
- Extent Reports jar file download
- Download Extent Reports Maven dependency
- Using Extent Reports in selenium with testNG
- Initializing Extent Reports
- Creating test cases with Extent Reports
- Creating Extent Reports nodes
- Creating a BDD test with Extent Report
- Taking screenshots with Extent Reports
- Inserting HTML on Extent Reports
- TLDR: How to use extent reports video
- TestNG Listener using Extent Reports
Extent Reports is a powerful tool for generating test execution reports in Selenium (Don’t miss my free selenium course). It allows you to create detailed and visually appealing reports that can be easily analyzed and understood by the team and stakeholders.
With this tool, you can easily identify any issues or failures that occurred during testing, and understand the overall progress of the testing efforts.
One of the key benefits of using Exten tReports is its ability to display test and step summaries, as well as test steps and their status, in a toggle view. This makes it easy to quickly identify any issues or failures that occurred during testing, and to understand the overall progress of the testing efforts.
In addition, it allows you to customize the reports by adding various events, screenshots, tags, devices, authors, and other relevant information. This can help to provide a more comprehensive understanding of the testing efforts and to highlight any important details or issues that may have been encountered during testing.
It also includes features such as the ability to add system and environment information, add custom test and step status, and even add network traffic logs. This makes the report even more informative and useful for identifying and troubleshooting issues.
Overall, Extent Reports is a valuable tool for QA engineers working with Selenium, as it helps to improve the efficiency and effectiveness of test execution reporting, and to better communicate the results of testing efforts to the team and stakeholders. With it, you can ensure that everyone is kept informed about the progress and quality of your projects, making it an essential tool for any Selenium automation testing project.
Contents
- 1 Download Extent Reports latest version
- 2 Extent Reports jar file download
- 3 Download Extent report Maven dependency dependency
- 4 Using Extent report Maven dependency in selenium with testNG
- 5 Initializing Extent Reports
- 6 Creating test cases with Extent Reports
- 7 Creating Extent Reports nodes
- 8 Creating a BDD test with Extent Report
- 9 Taking screenshots with Extent Reports
- 10 Inserting HTML on Extent Reports
- 11 TLDR: How to use extent reports video
- 12 TestNG Listener using Extent Reports
Download Extent Reports latest version
You can download the latest version of extent report here.
Extent Reports jar file download
The java extent reports project can be found here.
Download Extent report Maven dependency dependency
Download extent reports maven dependency from the maven repository, to do that, just add the following dependency to your pom.xml file:
<dependency>
    <groupId>com.aventstack</groupId>
    <artifactId>extentreports</artifactId>
    <version>${version}</version>
</dependency>
Once you added the dependency to your maven project, you just need to execute “mvn clean install” for the dependency to download.
Using Extent report Maven dependency in selenium with testNG
If you are a testNG user (or you want to learn how to use testng) and you want to use extent reports in selenium java, you can integrate the library into the framework.
Initializing Extent Reports
If you want to work with the extent report in selenium library, you have to initialize it in your code.
To do this, you can add the following code after importing the dependency with maven:
ExtentReports extent = new ExtentReports();
extent.attachReporter(reporterType);
You can add as many reports as you want, for example, in the following example 2 reporters are created:
ExtentAventReporter avent = new ExtentAventReporter("/user/build/");
ExtentKlovReporter klov = new ExtentKlovReporter("project", "build");

ExtentReports extent = new ExtentReports();
extent.attachReporter(avent);
extent.attachReporter(klov);

// or:
extent.attachReporter(avent, klov);
Creating test cases with Extent Reports
Now that we have the reporters created, we can start creating our test cases, in the following example, we are creating a test case in 3 different ways, the long, the shorthand, and the one with a description.
Which one you use does not matter, the 3 of them are creating a test case called “MyFirstTest”.
ExtentTest test = extent.createTest("MyFirstTest");
test.pass("details");

// short-hand
extent.createTest("MyFirstTest").pass("details");

// description
extent.createTest("MyFirstTest", "Test Description").pass("details");
Creating Extent Reports nodes
With nodes you can group test cases into different categories, by assigning the same parent node to more than one test:
ExtentTest test = extent.createTest("Test"); // level = 0
ExtentTest node = test.createNode("Node");  // level = 1
node.pass("details");

// short-hand
extent.createTest("MyFirstTest").createNode("MyFirstChildTest").pass("details");

// description
ExtentTest node = test.createNode("MyFirstChildTest", "Node Description");
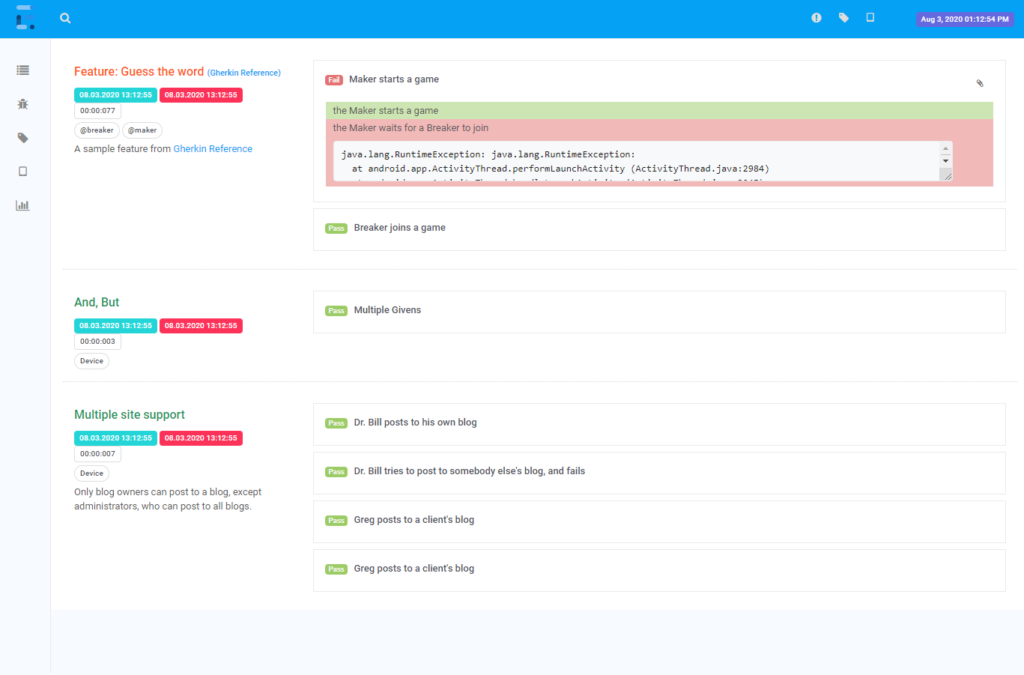
Creating a BDD test with Extent Report
If you are working with BDD (or you want to learn what is BDD), you can create your scenarios using the step/node approach we saw above:
// feature
ExtentTest feature = extent.createTest(Feature.class, "Refund item");

// scenario
ExtentTest scenario = feature.createNode(Scenario.class, "Jeff returns a faulty microwave");

// steps
scenario.createNode(Given.class, "Jeff has bought a microwave for $100").pass("pass");
scenario.createNode(And.class, "he has a receipt").pass("pass");
scenario.createNode(When.class, "he returns the microwave").pass("pass");
scenario.createNode(Then.class, "Jeff should be refunded $100").fail("fail");
If you want, you can also add the GherkinKeyword directly when creating the scenario:
// feature
ExtentTest feature = extent.createTest(new GherkinKeyword("Feature"), "Refund item");

// scenario
ExtentTest scenario = feature.createNode(new GherkinKeyword("Scenario"), "Jeff returns a faulty microwave");

// steps
scenario.createNode(new GherkinKeyword("Given"), "Jeff has bought a microwave for $100").pass("pass");
scenario.createNode(new GherkinKeyword("And"), "he has a receipt").pass("pass");
scenario.createNode(new GherkinKeyword("When"), "he returns the microwave").pass("pass");
scenario.createNode(new GherkinKeyword("Then"), "Jeff should be refunded $100").fail("fail");
Taking screenshots with Extent Reports
Screenshots are a great way to add more relevant information to your reports, adding them with extentreports is pretty easy:
test.addScreenCaptureFromBase64String("base64String");
Inserting HTML on Extent Reports
You can also insert HTML code in your reports in order to add more information about your tests:
extent.setSystemInfo("os", "win7");
TLDR: How to use extent reports video
Testing Mini Bytes has a great video about how to implement Extent Reports, you can watch it here:
TestNG Listener using Extent Reports
If you use Exten tReports and do not want to use it as a normal logger, it is also possible to use it as a listener for TestNG to still be able to generate a beautiful report with dashboards.
This post shows a extent report testng listener example. Since this is a basic sample, you can easily modify the listener to suit your needs by adding more features to it.
Adding Extent Report to testng listener
Below is a sample testng.xml with the listener added:
<?xml version="1.0" encoding="UTF-8"?>
<suite name="SuiteName">
    <listeners>
        <listener class-name="package.ExtentReporterNG" />
    </listeners>
    <test name="Test" allow-return-values="true">
        <classes>
            <class name="package.class" />
        </classes>
    </test>
</suite>
This is the listener class that the above testng.xml uses:
import java.io.File;
import java.util.Calendar;
import java.util.Date;
import java.util.List;
import java.util.Map;

import org.testng.IReporter;
import org.testng.IResultMap;
import org.testng.ISuite;
import org.testng.ISuiteResult;
import org.testng.ITestContext;
import org.testng.ITestResult;
import org.testng.xml.XmlSuite;

import com.relevantcodes.extentreports.ExtentReports;
import com.relevantcodes.extentreports.ExtentTest;
import com.relevantcodes.extentreports.LogStatus;

public class ExtentReporterNG implements IReporter {
    private ExtentReports extent;

    @Override
    public void generateReport(List<XmlSuite> xmlSuites, List<ISuite> suites, String outputDirectory) {
        extent = new ExtentReports(outputDirectory + File.separator + "Extent.html", true);

        for (ISuite suite : suites) {
            Map<String, ISuiteResult> result = suite.getResults();

            for (ISuiteResult r : result.values()) {
                ITestContext context = r.getTestContext();

                buildTestNodes(context.getPassedTests(), LogStatus.PASS);
                buildTestNodes(context.getFailedTests(), LogStatus.FAIL);
                buildTestNodes(context.getSkippedTests(), LogStatus.SKIP);
            }
        }

        extent.flush();
        extent.close();
    }

    private void buildTestNodes(IResultMap tests, LogStatus status) {
        ExtentTest test;

        if (tests.size() > 0) {
            for (ITestResult result : tests.getAllResults()) {
                test = extent.startTest(result.getMethod().getMethodName());

                test.getTest().startedTime = getTime(result.getStartMillis());
                test.getTest().endedTime = getTime(result.getEndMillis());

                for (String group : result.getMethod().getGroups())
                    test.assignCategory(group);

                String message = "Test " + status.toString().toLowerCase() + "ed";

                if (result.getThrowable() != null)
                    message = result.getThrowable().getMessage();

                test.log(status, message);

                extent.endTest(test);
            }
        }
    }

    private Date getTime(long millis) {
        Calendar calendar = Calendar.getInstance();
        calendar.setTimeInMillis(millis);
        return calendar.getTime();
    }
}
Let’s test the listener using the following 2 tests against Google (one passes, other fails):
// Notice in this example, there are no calls made to ExtentReports
//   but because ExtentReporterNG implements IReporter, a report will still get created
//   with passed and failed tests
// Output: http://relevantcodes.com/Articles/ExtentReporterNG/Extent.html
public class GoogleTest {
    private WebDriver driver;

    @Test
    public void googleAssertPass() {
        driver = new FirefoxDriver();
        driver.get("http://google.com");

        Boolean isFound = IsElementPresent(driver, By.cssSelector("input[value*='Google Search']"));

        Assert.assertTrue(isFound);
    }

    @Test
    public void googleAssertFail() {
        driver = new FirefoxDriver();
        driver.get("http://google.com");

        Boolean isFound = IsElementPresent(driver, By.cssSelector("input[value*='Googl Search']"));

        Assert.assertTrue(isFound);
    }

    private Boolean IsElementPresent(WebDriver driver, By by) {
        try
        {
            driver.findElement(by);
            return true;
        }
        catch (NoSuchElementException e) { return false; }
    }

    @AfterMethod
    public void afterMethod() {
        driver.quit();
    }
}
Pingback: Streamlining Quality Assurance: Effective Reporting in Selenium WebDriver - Relevant Codes